When it comes to getting a full picture of dental health, panoramic X-rays are often the go-to choice. Imagine trying to see an entire landscape through a small window—that’s what examining the mouth with standard intraoral X-rays can feel like! But panoramic X-rays change the game by capturing a complete view of the jaw, teeth, and surrounding structures in a single image, making it an invaluable tool in dental diagnosis.
The purpose of this blog is to offer a comprehensive guide to panoramic X-rays. We’ll explore what they are, how they work, and how to interpret their results, making sense of this crucial diagnostic tool in dentistry.
Table of Contents
What is a Panoramic X-ray?
A panoramic X-ray is a type of imaging that captures the entire mouth in one continuous shot. Unlike traditional dental X-rays that focus on specific teeth, panoramic X-rays provide a broader view, including all teeth, both jaws, sinuses, and the temporomandibular joints (TMJ).
Panoramic X-rays are taken using a machine that rotates around the patient’s head, capturing a complete picture of the mouth and surrounding structures. This imaging approach is non-invasive and provides essential information, often helping radiologists and dentists diagnose conditions that may be missed with individual X-rays.
Also read: Pleural Effusion on X-ray
Understanding Panoramic X-ray Anatomy
Panoramic X-rays capture the entire mouth in a single, sweeping image, revealing the structures that make up our dental and skeletal system. Interpreting this type of image starts with recognizing the basic anatomy and how each structure should appear. Let’s explore the main anatomical features of a panoramic X-ray and some tips for reading the image correctly.
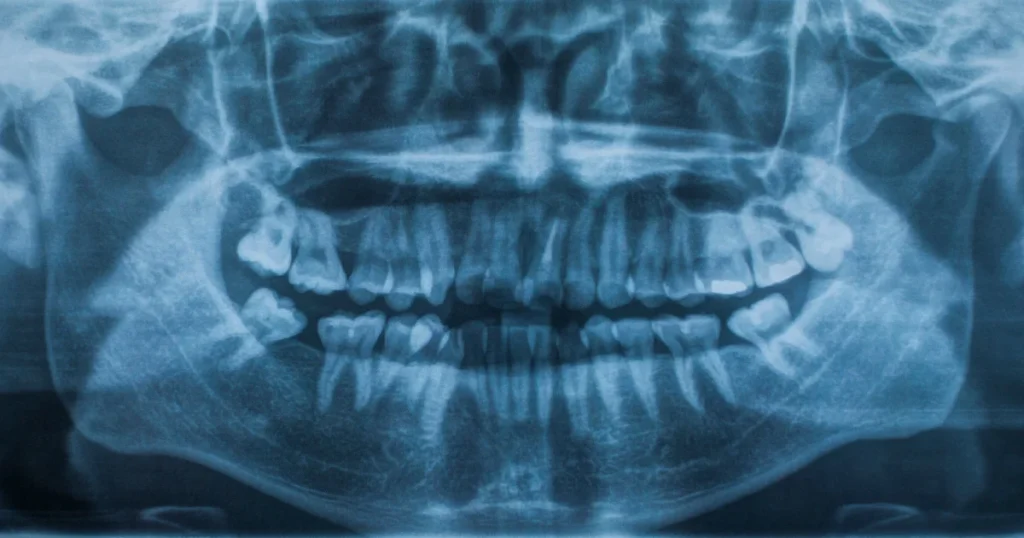
Basic Anatomy: Key Structures on a Panoramic X-ray
When you look at a panoramic X-ray, you’re seeing a detailed view of the mouth’s bony structures and soft tissue outlines. Here are the essential parts to focus on:
- Teeth: The most obvious features on a panoramic X-ray are the teeth. You’ll see all of the patient’s upper and lower teeth in a single view. The crowns, roots, and spaces between teeth are all visible, which can help identify cavities, alignment issues, or impacted teeth.
- Jaws: Both the upper (maxilla) and lower (mandible) jawbones are visible. You can evaluate their overall shape, density, and alignment, and even spot signs of bone loss or fractures.
- Sinuses: The maxillary sinuses are the air-filled spaces located above the upper molars, and they’re often visible on a panoramic X-ray. These structures are crucial to examine for signs of sinus inflammation or infections, especially if they extend close to the roots of the upper teeth.
- Temporomandibular Joints (TMJ): The TMJs, located on both sides of the jaw near the ear, connect the lower jaw to the skull. They’re visible on panoramic X-rays and should appear balanced and symmetrical. Observing these joints helps identify TMJ disorders or asymmetry.
Image Orientation: Reading a Panoramic X-ray
Proper orientation is key to interpreting panoramic X-rays accurately. Here’s a quick guide on orienting yourself with the image:
- Right and Left Sides: Panoramic X-rays typically have indicators (like “R” for right and “L” for left) to help you identify the patient’s left and right sides. Familiarizing yourself with these markers ensures you’re correctly reading the image.
- Midline Structures: The central part of the image represents the midline, where structures like the nose and the central incisors are aligned. This helps you differentiate between left and right and evaluate symmetry.
- Curved View: Unlike intraoral X-rays, panoramic images are curved to fit the natural arc of the mouth. This “wraparound” view is intentional, allowing you to see both sides of the jaw in one continuous image.
Common Anatomical Variations on Panoramic X-rays
Each patient’s anatomy is unique, and certain normal variations might appear on a panoramic X-ray. Recognizing these variations can prevent misinterpretation:
- Dental Anomalies: Extra teeth (supernumerary teeth), missing teeth, or variations in tooth size are relatively common and are usually harmless. Knowing these can appear on the X-ray without indicating a problem can help prevent unnecessary concern.
- Bony Asymmetry: Slight asymmetry in the jaw or TMJ may be a normal anatomical variation. However, significant asymmetry could indicate a growth disorder or TMJ issue.
- Vascular Channels and Air Spaces: Some patients have noticeable blood vessel channels within the jawbones or pronounced air spaces in the sinuses. These are typically normal findings but can sometimes resemble pathology if not recognized.
Understanding the anatomy on a panoramic X-ray is a skill that grows with practice. By focusing on the key structures, learning how to orient the image, and recognizing normal variations, you can better interpret these valuable images to support dental diagnoses and treatment planning.
Key Applications of Panoramic X-rays in Radiology
Panoramic X-rays have a wide range of applications, particularly in the fields of dentistry, orthodontics, and oral surgery. Below are some of the primary uses of this imaging technique:
1. Evaluating Impacted Teeth
One of the most common uses of panoramic X-rays is identifying impacted teeth, especially wisdom teeth. A panoramic X-ray can clearly show the positioning of these teeth and whether they’re causing any crowding or damage to nearby teeth.
2. Assessing Jawbone Health
Panoramic X-rays allow radiologists to assess the health of the jawbone, identifying issues like bone loss, fractures, or abnormalities. This is particularly useful for patients experiencing jaw pain or discomfort, as it can help detect underlying conditions that might not be visible through other types of dental imaging.
3. Detecting Cysts, Tumors, and Other Abnormalities
Panoramic X-rays can reveal cysts, tumors, and other growths in the jaw, sinus, or surrounding tissues. These X-rays help radiologists identify suspicious lesions early, allowing for timely intervention and treatment.
4. Preparing for Dental Implants
For patients considering dental implants, panoramic X-rays provide essential information about the jawbone’s structure and density. By evaluating the bone’s quality, radiologists and dentists can determine if implants are viable and where to position them effectively.
5. Orthodontic Treatment Planning
In orthodontics, panoramic X-rays play a critical role in treatment planning. They help orthodontists assess the alignment of teeth and determine any underlying issues, such as extra teeth or misalignment, that may affect treatment.
How Panoramic X-rays Work: A Radiologist’s Perspective
From a radiologist’s perspective, the process of capturing a panoramic X-ray image is quite fascinating. Here’s a breakdown of how it works:
- Patient Positioning: The patient stands or sits in the X-ray machine, with their chin resting on a support. They bite down on a small plastic tab to keep the head still and ensure proper alignment.
- Machine Rotation: The X-ray machine rotates around the patient’s head, moving from one side of the jaw to the other. This rotation allows it to capture a continuous image of the entire mouth.
- Image Capture: The machine captures multiple images from various angles and stitches them together into a single, wide-angle image that includes all the structures within the mouth and jaws.
- Digital Processing: In most modern systems, the captured image is processed digitally, allowing radiologists to adjust contrast, brightness, and zoom in for detailed examination of specific areas.
This unique imaging method provides radiologists with a full view of the oral cavity, making it an effective diagnostic tool for various dental and jaw conditions.
Benefits of Panoramic X-rays

Panoramic X-rays offer several advantages over traditional intraoral X-rays, making them a preferred choice for many diagnostic situations. Here are some key benefits:
1. Comprehensive View
Panoramic X-rays offer a comprehensive look at the entire mouth, providing a single image that includes both jaws, all teeth, and other structures. This broad view is invaluable in identifying widespread issues that may not be visible on traditional bitewing or periapical X-rays.
2. Time-Efficient
Compared to taking multiple intraoral X-rays to capture each area of the mouth, a panoramic X-ray is quick and efficient. The process only takes a few seconds, making it less time-consuming for both patients and radiology staff.
3. Lower Radiation Exposure
Panoramic X-rays generally expose patients to less radiation than a full set of intraoral X-rays. For patients requiring frequent imaging, such as orthodontic patients, this reduced exposure is beneficial.
4. Non-Invasive and Comfortable
Unlike traditional X-rays, which require placing film or sensors inside the mouth, panoramic X-rays are non-invasive. This makes the process more comfortable, especially for patients with gag reflex issues or small mouths.
5. Ideal for Orthodontics and Surgery
Since panoramic X-rays provide an overall view of the mouth, they’re ideal for treatment planning in orthodontics and maxillofacial surgery. By showing the positioning and relationship of all teeth, panoramic images help practitioners make informed decisions about patient care.
Limitations of Panoramic X-rays
While panoramic X-rays are beneficial, they also come with some limitations:
1. Less Detail on Individual Teeth
Panoramic X-rays provide a broad view but lack the detailed resolution needed for examining small cavities or cracks in individual teeth. For detailed dental examinations, intraoral X-rays are still essential.
2. Distortion and Magnification
The panoramic process can lead to some distortion or magnification, particularly at the edges of the image. This can sometimes make it difficult to assess exact measurements, such as the precise depth of a lesion.
3. Limited Detection of Soft Tissue
Panoramic X-rays are less effective in capturing soft tissue details. For soft tissue analysis, other imaging techniques like CT or MRI are usually preferred.
Panoramic X-Ray vs. Other Dental Imaging Techniques
In addition to panoramic X-rays, several other dental imaging techniques exist. Here’s a comparison to see when panoramic X-rays are most useful.
- Intraoral X-Rays: Provide high-detail images of individual teeth but lack the comprehensive view of panoramic X-rays. Used mainly for detecting cavities and examining specific teeth.
- Cone Beam CT: Offers a 3D view of the oral cavity, useful for complex cases like implant planning. However, it has a higher radiation dose compared to panoramic X-rays.
- MRI: Typically used for soft tissue evaluation and not often for routine dental imaging.
Each technique has its own advantages, and panoramic X-rays are particularly useful for initial screenings and broad assessments.
Interpreting Panoramic X-rays: A Step-by-Step Approach
Interpreting a panoramic X-ray may feel overwhelming at first glance, but a step-by-step approach can make it manageable and thorough. By assessing image quality and systematically reviewing each anatomical structure, you can ensure a detailed and accurate evaluation.
Initial Assessment: Checking the Basics
Before diving into the details, it’s essential to evaluate the overall quality of the X-ray image. This quick check helps ensure the scan is clear, correctly positioned, and free of errors.
- Image Quality: Look for the right balance in density and contrast. A well-contrasted image should reveal distinct boundaries between structures, with neither too much brightness nor shadowing.
- Patient Positioning: Ensure the patient was correctly positioned, with the entire mouth and jaw centered and aligned. Poor positioning can lead to distortions or missing areas.
- Artifacts and Technical Errors: Artifacts like shadows from jewelry or blurred areas from patient movement can distort the image. Identifying these early ensures you don’t mistake an artifact for a pathology.
Systematic Examination: Reviewing Each Structure
Once the image quality is confirmed, a systematic approach allows you to evaluate each structure in detail. Let’s break down each section of the panoramic X-ray.
Teeth: Examining Dental Details
The teeth are often the primary focus of a panoramic X-ray. Here’s what to look for:
- Number and Position: Count the teeth to confirm there are no missing, extra, or misplaced teeth. This is particularly helpful for identifying impacted or unerupted teeth.
- Size and Shape: Check for uniformity in size and shape, as significant differences can indicate developmental issues or trauma.
- Abnormalities: Look for caries (tooth decay), any restorations like fillings or crowns, and periapical lesions (infections at the root tips), which may appear as dark spots near the tooth root.
Jaws: Evaluating the Bone Structure
The maxilla (upper jaw) and mandible (lower jaw) are critical to examine for bone health and structural integrity.
- Bone Density: Dense, even bone texture is typically a sign of good health. Low-density areas could indicate osteoporosis, infections, or other bone conditions.
- Cortical Thickness: The cortical bone, which is the outer layer, should appear thick and solid. Thinning or irregularity might point to underlying pathology.
- Pathological Conditions: Look for any cysts, tumors, or fractures. Cysts may appear as round, radiolucent (dark) areas, while tumors might show as irregular shapes with varied density.
Sinuses: Observing the Air Spaces
The maxillary sinuses are visible on a panoramic X-ray, and they can offer clues about sinus health and potential issues.
- Size and Shape: The sinuses should appear as clear, hollow spaces. Significant asymmetry in size or unusual shape could suggest sinusitis or structural abnormalities.
- Opacities or Mucosal Thickening: Normally, sinuses appear dark (air-filled). Any white (opaque) areas or mucosal thickening could indicate fluid buildup or infection.
TMJ: Assessing the Jaw Joint
The temporomandibular joints (TMJ) are the points where the jaw meets the skull and are visible on both sides of the X-ray.
- Joint Space: Check for even spacing within the joint. Too little or too much space could be a sign of TMJ dysfunction.
- Condyle Position: The condyles, or rounded ends of the jawbone, should be centered in the joint space. If they appear misaligned, it may suggest dislocation or joint issues.
- Signs of Dysfunction: Look for any flattening, erosion, or irregularity in the bone that might indicate TMJ disorders, which can cause pain, difficulty in jaw movement, and other issues.
By following this step-by-step approach, you can ensure a thorough interpretation of a panoramic X-ray. Starting with image quality and moving through each anatomical structure allows you to catch any abnormalities and provide an accurate assessment that supports effective patient care.
How Radiologists Can Enhance Panoramic X-Ray Interpretation
For radiologists, interpreting panoramic X-rays involves a trained eye and an understanding of common anomalies. Here are a few tips for maximizing the effectiveness of panoramic X-rays:
- Adjust the Image Settings: Use digital tools to adjust brightness and contrast for optimal clarity.
- Be Mindful of Artifacts: Look out for artifacts caused by patient movement, which can interfere with the clarity of the image.
- Cross-Check with Other Imaging: If something unusual is detected, it may be helpful to follow up with other imaging techniques for a more comprehensive assessment.
Common Pathological Findings on Panoramic X-rays
Panoramic X-rays provide a wide view of the mouth, making them an essential tool for spotting various dental pathologies. Some common findings include periapical lesions, cysts, tumors, developmental anomalies, and traumatic injuries. Understanding the distinct appearances of these conditions on X-rays helps in diagnosing and planning effective treatment.
Periapical Lesions: Infections Around the Tooth Root
Periapical lesions are infections or inflammatory changes near the tip (apex) of a tooth’s root, often caused by decay or trauma. These lesions appear dark (radiolucent) on X-rays due to bone loss around the infection site. Here are a few types:
- Periapical Abscess: An abscess looks like a dark, round area near the tooth root. It indicates a pocket of pus, often with surrounding bone loss, and suggests an active infection.
- Periapical Cyst: Cysts are often larger than abscesses, showing as a well-defined, dark, round area. These cysts can develop over time as a response to long-term inflammation.
- Periapical Granuloma: A granuloma is also a dark, round area but is usually smaller and indicates chronic inflammation rather than an active infection.
Cysts and Tumors: Abnormal Growths in the Jaw
Cysts and tumors can form within the jaw and may be related to dental origins (odontogenic). Recognizing these on X-rays can help prevent complications by allowing for early intervention.
- Dentigerous Cyst: This cyst forms around the crown of an unerupted tooth, typically appearing as a dark area with a clear border that encircles the tooth. It’s most common with wisdom teeth.
- Radicular Cyst: This cyst forms at the root of a dead or dying tooth. It presents as a round, dark area with well-defined borders and often appears near teeth with extensive decay.
- Odontogenic Keratocyst (OKC): OKCs are unique cysts with a tendency to grow aggressively. They appear as dark, multilocular (multi-chambered) areas and often impact multiple teeth.
- Ameloblastoma: This benign tumor can appear similar to OKCs, with a multilocular pattern and well-defined, dark spaces. Ameloblastomas require surgical removal due to their aggressive nature.
Developmental Anomalies: Unusual Tooth and Jaw Growth
Panoramic X-rays are especially helpful in identifying developmental anomalies, allowing dentists to monitor unusual growth patterns and decide on possible treatments.
- Impacted Teeth: Impacted teeth, particularly wisdom teeth, are common findings on X-rays. They appear tilted or completely horizontal and can press against neighboring teeth or the jawbone, often requiring removal.
- Supernumerary Teeth: Extra teeth (supernumerary teeth) can disrupt the alignment of normal teeth. On an X-ray, they show up as additional, fully formed teeth in unexpected places.
- Odontogenic Keratocyst: Sometimes, these cysts are considered a developmental anomaly, especially if they occur repeatedly or alongside other dental issues. They appear dark, with defined, multi-chambered patterns that can push against adjacent teeth.
Traumatic Injuries: Detecting Fractures and Dislocations
Panoramic X-rays are often used to assess traumatic injuries, as they can capture both hard and soft tissue damage, which helps in diagnosing fractures or dislocations.
- Fractures: Jaw fractures may appear as dark, irregular lines across the bone, interrupting the continuity of the jaw. Common fracture sites include the mandible (lower jaw) and the maxilla (upper jaw).
- Dislocations: A dislocated TMJ (temporomandibular joint) can be identified by misalignment of the jawbone near the joint area, which may show up as an asymmetrical position of the condyles.
- Dental Trauma: Damage to individual teeth, like cracks or root fractures, may also be visible on panoramic X-rays. Fractured teeth often appear as disrupted, jagged lines through the tooth structure.
Recognizing these common pathologies on a panoramic X-ray is a critical skill in dental radiology. From infections to developmental anomalies and injuries, identifying these patterns enables dentists and radiologists to diagnose conditions more accurately and provide appropriate care.
Practical Considerations for Radiology Professionals
For radiologists, understanding the practical aspects of panoramic X-rays, from machine calibration to patient positioning, can make a significant difference in image quality and diagnostic accuracy.
- Machine Calibration: Regularly calibrate the X-ray machine to ensure consistent image quality and accurate results.
- Patient Positioning: Proper positioning minimizes distortion and helps create clear, readable images.
- Patient Communication: Educate patients on what to expect during the procedure and emphasize the benefits of the panoramic view.
Which Medical X-ray Film is suitable for Panoramic X-ray?
When it comes to panoramic X-rays, medical dry film is often the way to go! These X-rays are designed to capture a full view of your mouth and jaw, so having high-resolution images is really important. Dry film gives you clear and detailed pictures, making it easier for dentists to provide an accurate diagnosis and plan the best treatment for you. Looking for high-quality medical dry film at a generous price? Look no further! Check out our dry film—we’re sure you’ll find exactly what you need!
Conclusion
Interpreting panoramic X-rays accurately plays a crucial role in effective dental diagnosis and treatment planning. By understanding what to look for, from periapical lesions to developmental anomalies and traumatic injuries, dental professionals can provide better care and address potential issues early on. Whether it’s identifying a hidden cyst or confirming a fracture, the ability to read panoramic X-rays is invaluable in ensuring comprehensive oral health for patients.
If you found this guide helpful, feel free to share it with colleagues, friends, or anyone curious about dental radiology! Have questions or thoughts to share? Drop a comment below or reach out—we’d love to hear from you!
