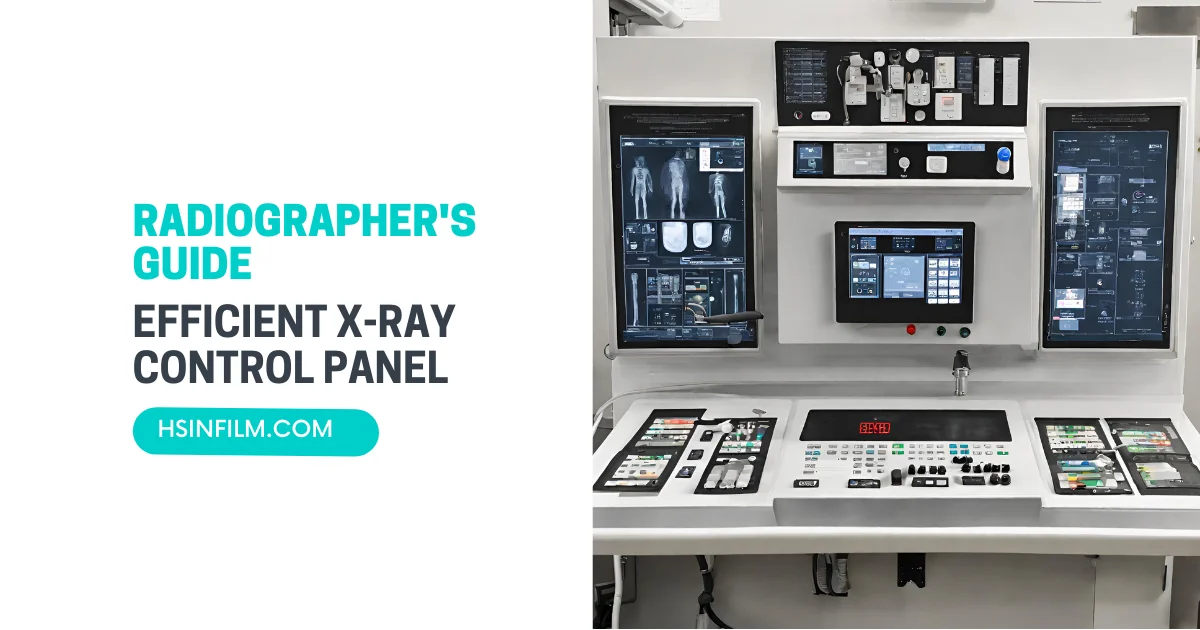
Radiographers play a pivotal role in capturing clear and accurate X-ray images, and mastering the use of an X-ray control panel is essential for optimal performance. This guide is designed to empower radiographers with insights into maximizing efficiency and ensuring precision when operating X-ray control panels.
Table of Contents
Overview of X-ray Control Panel
An X-ray control panel is a fundamental component of X-ray imaging systems, serving as the user interface for operating X-ray equipment. It plays a crucial role in facilitating the precise control and customization of X-ray exposures, ensuring optimal imaging quality while maintaining safety standards. Here’s an overview of the key features and functionalities typically found in an X-ray control panel:
1. Exposure Time
Function:
Exposure time refers to how long the X-ray tube is active and emitting radiation. It’s measured in seconds or fractions of a second.
Purpose and Impact:
- Image Brightness: Longer exposure times result in more X-rays passing through the body, creating a brighter image. Shorter exposure times yield a darker image.
- Patient Safety: Reducing exposure time decreases the patient’s exposure to radiation, which is crucial for minimizing the risk of radiation-induced complications.
- Motion Artifacts: Shorter exposure times are preferred to reduce the likelihood of motion blurring, especially in patients who may find it hard to remain still.
2. Kilovolt Peak (kVp)
Function:
kVp controls the peak voltage applied across the X-ray tube, which influences the energy and penetrating power of the X-rays produced.
Purpose and Impact:
- Image Contrast: Higher kVp results in lower contrast images, useful for visualizing dense structures like bones, while lower kVp produces higher contrast, which is better for soft tissues.
- Penetration Power: Adjusting the kVp alters the ability of X-rays to penetrate tissues, which is crucial for imaging different body parts with varying densities.
- Radiation Dose: Higher kVp reduces the patient’s absorbed dose because it increases the proportion of X-rays that pass through the body, although it also requires careful management to avoid over-penetration and loss of image detail.
3. Filtration
Function:
Filtration involves the use of materials, typically aluminum, placed in the path of the X-ray beam to absorb low-energy photons before they reach the patient.
Purpose and Impact:
- Patient Safety: Filters reduce the number of low-energy X-rays that are absorbed by the patient’s tissues but don’t contribute to image formation, thereby lowering the patient’s radiation dose.
- Image Quality: By removing low-energy photons, filtration enhances the quality of the X-ray image by reducing the scattering of radiation and improving contrast.
- Regulatory Compliance: Filtration is often required by safety regulations to ensure that only the necessary radiation reaches the patient, adhering to the ALARA (As Low As Reasonably Achievable) principle in radiology.
4. Milliampere (mA)
Function: Milliampere (mA) controls the amount of electrical current passing through the X-ray tube, which affects the number of X-ray photons produced.
Purpose and Impact:
- Image Density: Higher mA settings increase the number of X-rays generated, resulting in a denser (darker) image. Lower mA produces a lighter image.
- Exposure Time Balance: mA is often adjusted in conjunction with exposure time to achieve the desired image density without overexposing the patient to radiation.
- Radiation Dose: Increasing mA increases the radiation dose to the patient, so it must be carefully balanced to ensure sufficient image quality while minimizing exposure.
5. Automatic Exposure Control (AEC)
Function: Automatic Exposure Control (AEC) is a feature that automatically adjusts the exposure parameters (like time, mA, and sometimes kVp) based on the patient’s anatomy and the desired image quality.
Purpose and Impact:
- Consistency: AEC ensures consistent image quality across different patients and anatomical regions by automatically adjusting settings to compensate for variations in tissue density.
- Patient Safety: By automatically selecting optimal exposure parameters, AEC helps minimize radiation exposure while still producing high-quality images.
- Ease of Use: AEC simplifies the operation of X-ray machines, particularly for less experienced technicians, by reducing the need for manual adjustments.
6. Focus Spot Size
Function: The focus spot size refers to the size of the area on the anode of the X-ray tube where the electron beam is focused to produce X-rays.
Purpose and Impact:
- Image Resolution: A smaller focus spot size results in higher image resolution, which is important for detailed imaging of fine structures. However, it also means lower power handling and potentially longer exposure times.
- Heat Management: Larger focus spots can handle more heat and allow for shorter exposure times but at the cost of reduced image sharpness.
- Application-Specific Use: Different clinical applications may require different focus spot sizes; for example, a smaller spot size is preferred for extremities and fine details, while larger spots might be used for chest or abdominal imaging.
7. Collimation
Function: Collimation is the adjustment of the X-ray beam size and shape using lead shutters, controlling the area of the body exposed to radiation.
Purpose and Impact:
- Image Quality: Proper collimation reduces scatter radiation, which improves image contrast and sharpness by limiting the X-ray beam to the area of interest.
- Radiation Protection: Collimating the X-ray beam to the smallest necessary area significantly reduces the patient’s exposure to unnecessary radiation, enhancing safety.
- Regulatory Requirements: Many safety guidelines mandate the use of collimation to ensure that only the necessary part of the body is exposed, in line with best practices for radiation protection.
8. Grid Control
Function: A grid is a device placed between the patient and the X-ray detector to absorb scattered radiation before it reaches the detector, improving image quality.
Purpose and Impact:
- Image Clarity: Grids enhance image quality by reducing scatter radiation, which can cause fogging and blur the image.
- Radiation Dose: While grids improve image quality, they also increase the radiation dose because more X-rays are required to penetrate the grid. This requires a careful balance between image clarity and patient safety.
- Use in Specific Examinations: Grids are particularly useful in imaging thicker body parts, such as the abdomen or chest, where scatter radiation is more prevalent.
9. X-Ray Tube Voltage Selection (Dual kVp)
Function: Some advanced X-ray systems allow for dual kVp settings, where the machine alternates between two different voltage levels during a single exposure.
Purpose and Impact:
- Enhanced Contrast: Dual kVp imaging can enhance tissue contrast by using one kVp for better soft tissue visualization and another for bone structures.
- Material Discrimination: This feature is particularly useful in differentiating materials with similar densities, such as distinguishing between calcifications and soft tissue in mammography or identifying contrast agents in CT scans.
- Diagnostic Accuracy: By providing multiple energy levels in one image, dual kVp can improve the diagnostic accuracy of complex cases.
10. Exposure Compensation
Function: Exposure compensation allows the operator to manually adjust the exposure settings (like mA or exposure time) to compensate for factors such as patient size, anatomy, or the presence of prosthetic devices.
Purpose and Impact:
- Customized Imaging: Exposure compensation enables tailored adjustments to ensure that each patient receives the appropriate amount of radiation for optimal image quality, regardless of individual differences.
- Operator Control: This feature provides more control to the technician, allowing fine-tuning of automatic settings based on specific needs or clinical judgment.
- Patient Safety: Proper use of exposure compensation helps avoid underexposure or overexposure, thereby protecting patient safety while ensuring diagnostic-quality images.
The X-ray control panel is a central component that empowers radiologic technologists to tailor X-ray exposures to the specific requirements of each imaging scenario. Its features are designed to enhance imaging precision, optimize patient safety, and streamline the overall radiographic process.
Also read: Comparative Analysis of X-rays in Periodontal Disease and Normal Dentition
X-ray Control Panel Techniques for Quality Radiographs

The X-ray control panel is a vital component in radiographic imaging, allowing technologists to manipulate exposure parameters for optimal image quality while minimizing radiation dose. Mastering control panel techniques is crucial for obtaining diagnostic radiographs. Here’s a comprehensive guide to the key techniques involved:
1. kVp (Kilovoltage Peak) Selection: Adjust the kVp setting to control the quality and penetration of X-rays. Higher kVp values are suitable for imaging denser body parts, providing increased penetration.
2. mA (Milliamperage) Adjustment: Modify the mA setting to regulate the quantity of X-rays produced. Higher mA values enhance image brightness but may increase patient dose. Optimal mA selection depends on patient size and image quality requirements.
3. Exposure Time Setting: Choose the exposure time, measured in milliseconds (ms) or seconds, to control the duration of X-ray exposure. Shorter exposure times reduce the likelihood of motion artifacts and enhance image sharpness.
4. Automatic Exposure Control (AEC): Utilize AEC technology if available. AEC adjusts exposure parameters based on the detected radiation reaching the image receptor, ensuring consistent image quality across different patient sizes.
5. Anatomical Program Selection: Use pre-programmed anatomical settings on the control panel for specific body parts. Anatomical programs streamline the selection of appropriate exposure parameters, optimizing image acquisition.
6. Collimation Adjustment: Adjust the collimator to match the imaging area precisely. Proper collimation minimizes unnecessary radiation exposure and focuses the X-ray beam on the region of interest.
7. Filtration Management: Select appropriate X-ray beam filtration to optimize image quality. Filtration helps remove low-energy X-rays, reducing patient dose while maintaining diagnostic quality.
8. Source-to-Image Distance (SID) Control: Adjust the SID to achieve the desired magnification and spatial resolution. Maintaining a consistent SID is essential for accurate measurements and reproducibility.
9. Grid Selection (if applicable): Employ a grid when imaging body parts with varying thickness. The grid improves image contrast by reducing scatter radiation, enhancing the visibility of anatomical details.
10. Technique Chart Reference: Refer to the facility’s technique chart for guidance on exposure settings. Technique charts provide recommended parameters based on anatomical considerations and imaging equipment.
11. Patient Positioning and Immobilization: Ensure proper patient positioning and immobilization to minimize motion artifacts. Clear communication with the patient helps maintain stillness during exposure.
12. Image Review and Retake Protocols: Develop systematic protocols for reviewing images on the display monitor. If necessary, establish criteria for retaking images to address positioning or exposure errors.
By incorporating these techniques into routine practice, radiologic technologists can optimize the X-ray control panel’s functionalities, resulting in high-quality radiographs with minimized radiation exposure. Adhering to established protocols and ongoing professional development are essential for refining these skills and ensuring patient safety.
Explore Advanced Features
Exploring advanced features such as Automatic Exposure Control (AEC), image processing algorithms, and digital image management systems reveals how modern X-ray technology can significantly enhance diagnostic accuracy, efficiency, and patient safety. Here’s an in-depth look at these advanced features:
1. Automatic Exposure Control (AEC)
Automatic Exposure Control (AEC) is an advanced feature in X-ray imaging that automates the selection of optimal exposure settings based on the specific anatomical area being examined.
How AEC Works:
- Sensor-Based Adjustment: AEC uses sensors placed behind the patient or within the X-ray detector to measure the amount of radiation passing through the patient’s body.
- Real-Time Adjustments: Based on this measurement, AEC automatically adjusts the exposure parameters (such as time and mA) in real-time to achieve the desired image quality.
- Consistency: AEC ensures consistent image quality across different patients and body parts by compensating for variations in tissue density and composition.
Impact on Image Quality:
- Enhanced Consistency: AEC minimizes the variability in image quality caused by differences in patient size, tissue composition, or positioning, leading to more reliable and repeatable diagnostic images.
- Error Reduction: By automating exposure control, AEC reduces the risk of human error, ensuring that the correct exposure settings are used for each examination.
Impact on Patient Safety and Radiation Exposure:
- Dose Optimization: AEC helps to optimize the radiation dose by adjusting the exposure to the minimum level necessary to achieve a high-quality image, reducing unnecessary radiation exposure to the patient.
- Personalized Care: AEC tailors the radiation dose to each patient’s specific anatomy, providing a more personalized approach to imaging, particularly important for vulnerable populations like children or pregnant women.
2. Image Processing Algorithms
Image processing algorithms are advanced computational techniques used to enhance, analyze, and interpret medical images, improving the diagnostic value of X-ray examinations.
Types of Image Processing Algorithms:
- Noise Reduction Algorithms: These algorithms filter out random noise from the image, improving clarity and making it easier to detect subtle abnormalities.
- Edge Enhancement: This technique sharpens the boundaries between different tissues, such as bone and soft tissue, making it easier to identify fractures, lesions, or other pathologies.
- Contrast Enhancement: Algorithms can automatically adjust the contrast levels in an image to improve the visibility of specific structures or abnormalities, particularly in soft tissues.
- Artifact Reduction: Algorithms can reduce or eliminate artifacts (unwanted distortions or anomalies) caused by patient movement, metal implants, or other factors, ensuring a clearer image.
Impact on Image Quality:
- Improved Diagnostic Accuracy: Enhanced image processing leads to higher-quality images with better contrast, sharpness, and clarity, which can improve diagnostic accuracy and confidence.
- Customization: Advanced algorithms can be customized or selected based on the specific clinical scenario, allowing radiologists to tailor the image quality to the needs of each examination.
Impact on Patient Safety and Radiation Exposure:
- Reduced Need for Re-Exposures: Improved image quality reduces the likelihood of needing repeat X-rays due to poor image quality, thus minimizing the patient’s cumulative radiation exposure.
- Dose Reduction: By enhancing image quality, these algorithms can allow for lower radiation doses while still achieving diagnostically useful images.
3. Digital Image Management Systems
Digital image management systems, such as Picture Archiving and Communication Systems (PACS) and Radiology Information Systems (RIS), are critical components of modern medical imaging departments. They provide efficient storage, retrieval, and sharing of digital images and related data.
Key Features of Digital Image Management Systems:
- PACS (Picture Archiving and Communication System):
- Centralized Storage: PACS stores digital images and related reports in a centralized database, allowing easy access and retrieval by authorized personnel.
- Remote Access: Images and reports can be accessed remotely by radiologists or referring physicians, enabling faster diagnosis and treatment planning, especially in telemedicine settings.
- Integration: PACS integrates with other hospital systems, such as Electronic Health Records (EHR), allowing seamless sharing of images and patient information across different departments.
- RIS (Radiology Information System):
- Workflow Management: RIS manages the workflow of radiology departments, from patient scheduling to image acquisition, reporting, and billing, ensuring efficient operations.
- Data Management: RIS tracks patient data, examination details, and radiology reports, providing a comprehensive view of the patient’s imaging history and facilitating better clinical decision-making.
Impact on Image Quality:
- Consistent Image Retrieval: Digital management systems ensure that high-quality images are consistently available for review, comparison, and analysis, enhancing the overall diagnostic process.
- Enhanced Collaboration: Easy access to images and reports fosters collaboration between radiologists, referring physicians, and other healthcare professionals, leading to more informed and accurate diagnoses.
Impact on Patient Safety and Radiation Exposure:
- Reduction in Repeat Examinations: With easy access to previous images and reports, clinicians can avoid unnecessary repeat examinations, reducing the patient’s cumulative radiation exposure.
- Data Security and Compliance: Digital systems ensure secure storage and sharing of patient data, complying with regulations such as HIPAA, which protects patient privacy and safety.
The integration of advanced features like Automatic Exposure Control (AEC), image processing algorithms, and digital image management systems has revolutionized X-ray imaging, making it more efficient, accurate, and safe. These technologies not only improve the quality of the images produced but also enhance patient safety by optimizing radiation doses and ensuring that images are managed and accessed in a way that supports high-quality care. As X-ray technology continues to evolve, these advanced features will play an increasingly important role in delivering better outcomes for patients and healthcare providers alike.
Impact of Different Settings on X-ray Control Panel
The settings on an X-ray control panel have a significant impact on image quality, patient safety, and radiation exposure. Understanding how to balance these factors is crucial for achieving optimal diagnostic results while minimizing risks to the patient. Here’s an in-depth discussion of the impact of different settings:
1. Exposure Time
Impact on Image Quality:
- Image Clarity: Longer exposure times allow more X-rays to penetrate the tissue, resulting in clearer and more detailed images. However, excessively long exposure can lead to motion blur if the patient moves during the procedure.
- Noise Reduction: Increased exposure time can reduce image noise, making it easier to distinguish between different tissue types or detect small abnormalities.
Impact on Patient Safety and Radiation Exposure:
- Increased Dose: Longer exposure times directly increase the amount of radiation the patient receives, which can raise the risk of radiation-induced damage.
- Risk Management: Technicians must balance the need for image clarity with the goal of keeping exposure time as short as possible to minimize radiation risks.
2. Kilovolt Peak (kVp)
Impact on Image Quality:
- Penetration Power: Higher kVp settings increase the energy of the X-rays, allowing them to penetrate denser tissues like bone. This results in images with greater contrast between different tissue types.
- Contrast Control: Lower kVp settings provide higher contrast images, which can be useful for soft tissue imaging but may result in poorer bone detail.
Impact on Patient Safety and Radiation Exposure:
- Reduced Dose at Higher kVp: While increasing kVp can increase image penetration, it also decreases the amount of radiation absorbed by the patient’s tissues, thus reducing the overall radiation dose.
- Compromise on Contrast: High kVp settings can reduce image contrast, which may make it harder to detect subtle abnormalities, requiring careful adjustment based on the clinical needs.
3. Milliampere (mA)
Impact on Image Quality:
- Density Adjustment: Higher mA settings produce more X-rays, leading to denser images with improved detail, especially in thicker body parts.
- Noise Reduction: Adequate mA levels reduce the graininess or noise in the image, making it easier to interpret the results.
Impact on Patient Safety and Radiation Exposure:
- Increased Radiation: Higher mA settings increase the radiation dose to the patient, so it’s essential to use the lowest mA that still produces a diagnostically useful image.
- Balancing Act: Technicians need to find the right balance between mA and exposure time to achieve the desired image quality while minimizing the radiation dose.
4. Focus Spot Size
Impact on Image Quality:
- Resolution vs. Exposure Time: A smaller focus spot size enhances image resolution, making fine details more visible. However, it may require longer exposure times to produce a clear image.
- Image Sharpness: Larger focus spots decrease image sharpness but can handle more heat, allowing for shorter exposure times, which can be advantageous in certain clinical situations.
Impact on Patient Safety and Radiation Exposure:
- Shorter Exposures with Larger Spots: Using a larger focus spot can reduce the exposure time, thereby potentially lowering the radiation dose to the patient.
- Specific Applications: The choice of focus spot size should be matched to the diagnostic need—smaller for detailed imaging and larger for general surveys, always considering patient safety.
5. Collimation
Impact on Image Quality:
- Scatter Reduction: Proper collimation reduces scatter radiation, improving image contrast and sharpness by focusing the X-ray beam only on the area of interest.
- Image Detail: By limiting the X-ray beam to a specific area, collimation can enhance the visibility of small structures or abnormalities within that area.
Impact on Patient Safety and Radiation Exposure:
- Reduced Radiation Exposure: Collimation minimizes radiation exposure to surrounding tissues by restricting the X-ray beam to the necessary area, significantly enhancing patient safety.
- Regulatory Compliance: Ensuring proper collimation is essential for meeting safety standards and guidelines, which are designed to protect patients from unnecessary radiation.
6. Automatic Exposure Control (AEC)
Impact on Image Quality:
- Consistent Results: AEC automatically adjusts exposure parameters based on the patient’s anatomy, ensuring consistent image quality across different body parts and patients.
- Minimized Errors: By reducing the need for manual adjustments, AEC minimizes the risk of human error, leading to more reliable diagnostic images.
Impact on Patient Safety and Radiation Exposure:
- Optimized Radiation Dose: AEC helps maintain the lowest possible radiation dose by automatically selecting the optimal exposure settings for each patient and examination type.
- Enhanced Safety: By tailoring the exposure to the individual patient, AEC reduces the risk of overexposure, particularly in more sensitive or vulnerable populations such as children or pregnant women.
7. Grid Use
Impact on Image Quality:
- Scatter Elimination: Grids improve image clarity by absorbing scatter radiation before it reaches the detector, which enhances contrast and detail.
- Resolution: The use of grids is particularly important in imaging thicker body parts, where scatter radiation is more prevalent and can degrade image quality.
Impact on Patient Safety and Radiation Exposure:
- Increased Dose: The use of a grid requires an increase in radiation dose to compensate for the X-rays absorbed by the grid, necessitating careful consideration of its necessity for each case.
- Selective Application: Grids should be used selectively, depending on the clinical requirement for image clarity versus the need to minimize radiation exposure.
8. Dual kVp Selection
Impact on Image Quality:
- Enhanced Contrast: Dual kVp settings provide better differentiation between tissues of similar density, improving diagnostic accuracy for conditions like soft tissue lesions or calcifications.
- Material Discrimination: This setting is particularly useful for distinguishing between different materials, such as bone versus soft tissue or detecting contrast agents.
Impact on Patient Safety and Radiation Exposure:
- Controlled Exposure: Dual kVp can be used to optimize image quality without a significant increase in radiation dose, as it allows for better tissue differentiation with potentially lower kVp settings.
- Specific Applications: This setting is particularly valuable in complex cases where enhanced contrast is necessary without increasing overall radiation exposure.
The settings on an X-ray control panel are crucial for balancing image quality, patient safety, and radiation exposure. By understanding and carefully adjusting parameters like exposure time, kVp, mA, focus spot size, collimation, AEC, grid use, and dual kVp selection, radiologic technologists can optimize diagnostic outcomes while minimizing risks. This balance is essential for ensuring that patients receive the most accurate diagnosis with the least possible exposure to harmful radiation.
Image Processing Tools: Enhancing Radiographic Imaging Quality
Image processing tools play a pivotal role in refining and optimizing radiographic images, contributing to the diagnostic accuracy of medical imaging. These tools allow radiologic technologists and radiologists to manipulate and enhance images to extract valuable information. Here’s an overview of essential image processing tools used in diagnostic imaging:
1. Windowing and Leveling: Adjusting the window width and level helps control the contrast and brightness of an image. This tool is crucial for visualizing specific anatomical structures and optimizing image clarity.
2. Zoom and Magnification: Zoom and magnification tools enable a closer inspection of specific regions of interest within an image. This capability is valuable for detailed analysis and accurate diagnosis.
3. Rotation and Flip: Radiographers can rotate or flip images to correct orientation discrepancies, ensuring proper alignment for accurate interpretation by healthcare professionals.
4. Annotation and Marking: Annotation tools allow radiologists to add labels, measurements, and markings directly onto the images. This aids in communication, documentation, and the precise localization of abnormalities.
5. Image Stitching: Image stitching tools combine multiple images to create a panoramic or composite view. This is particularly useful in procedures such as orthopedic imaging or dental panoramic radiography.
6. Noise Reduction Filters: Filters designed to reduce noise in radiographic images improve overall image quality. These filters enhance diagnostic confidence by minimizing unwanted artifacts.
7. Contrast Enhancement: Contrast enhancement tools help improve the visibility of subtle variations in tissue density. This is crucial for identifying abnormalities and ensuring a comprehensive evaluation.
8. Edge Enhancement: Edge enhancement tools highlight the borders of structures, making fine details more distinguishable. This aids in the identification of boundaries and contours.
9. Histogram Adjustment: Histogram adjustment allows for the optimization of image distribution, enhancing the overall tonal quality. It is beneficial in achieving a balanced representation of different tissue densities.
10. Cropping and Region of Interest (ROI) Selection: Radiographers can crop images and select specific regions of interest for focused analysis. This assists in highlighting specific areas for a more detailed examination.
11. Image Fusion: Image fusion tools integrate information from multiple imaging modalities, providing a comprehensive and correlated view of different aspects of the patient’s anatomy.
12. Image Printing and Export: Tools for printing and exporting images in various formats facilitate documentation, collaboration, and archiving for future reference.
Proficient utilization of these image processing tools requires ongoing training and familiarity with the specific functionalities of the imaging system in use. Radiographers and radiologists should stay informed about advancements in technology to leverage the full potential of these tools for enhanced patient care and diagnostic accuracy.
Technique Chart Reference for Setting X-ray Control Panel

A technique chart is a comprehensive reference guide that aids radiologic technologists in selecting optimal exposure settings for X-ray examinations. It serves as a valuable tool for achieving diagnostic-quality images while minimizing patient radiation exposure. Here’s an overview of the key elements included in a technique chart for setting X-ray control panel parameters:
1. Anatomical Regions: The chart categorizes different anatomical regions or body parts, such as the chest, abdomen, extremities, and spine. Each section provides specific exposure recommendations tailored to the unique characteristics of the area being imaged.
2. Patient Size and Age: Recommendations vary based on patient size and age. The chart typically outlines exposure factors for pediatric, adult, and larger or smaller patients. Adjustments account for the varying thickness of body tissues.
3. Exposure Factors: Exposure factors include kVp (kilovoltage peak), mAs (milliampere-seconds), and sometimes additional parameters like exposure time. These factors are determined based on the anatomical region and patient characteristics.
4. Grid Usage: If a grid is required for specific examinations, the chart provides guidance on when to use it and recommends appropriate grid ratios. Grids help improve image quality by reducing scattered radiation.
5. Filtration Requirements: The chart specifies the amount of inherent and added filtration necessary for different X-ray examinations. Proper filtration ensures that the X-ray beam is appropriately hardened, contributing to image quality and radiation safety.
6. Collimation Guidelines: Collimation refers to the restriction of the X-ray beam to the area of interest. The chart provides recommendations on collimating the X-ray field, promoting effective dose reduction and focusing radiation on the targeted anatomy.
7. SID (Source-to-Image Distance): The recommended SID is crucial for maintaining image sharpness and consistency. The technique chart outlines the appropriate source-to-image distance for various examinations.
8. Positioning Instructions: Proper patient positioning is essential for obtaining diagnostic images. The technique chart may include positioning guidelines, ensuring that patients are correctly aligned to achieve optimal imaging results.
9. Special Considerations: Some technique charts include special considerations for specific conditions or imaging scenarios. For example, examinations involving contrast agents or special patient populations may require unique exposure adjustments.
10. Emergency Settings: In emergency situations, the technique chart may offer quick-reference settings for rapid image acquisition while prioritizing patient safety.
11. Quality Assurance and Repeat Analysis: The technique chart may incorporate recommendations for quality assurance practices and procedures for analyzing and minimizing repeat exposures.
Radiologic technologists should adhere to the guidelines outlined in the technique chart and collaborate with radiologists to ensure the appropriate selection of exposure factors. Regular updates to the technique chart, based on ongoing quality assurance assessments and advancements in technology, contribute to the continuous improvement of imaging practices.
Safety Measures for X-ray Control Panel Operation
Ensuring the safe operation of an X-ray control panel is paramount to protect both healthcare professionals and patients from unnecessary radiation exposure. Implementing proper safety measures contributes to maintaining a secure radiographic environment. Here are key safety measures associated with X-ray control panel operation:
1. Operator Training: Radiologic technologists operating the X-ray control panel should undergo comprehensive training on its usage, safety protocols, and radiation protection measures. This training ensures that operators are proficient in handling the equipment and minimizing radiation risks.
2. Adherence to ALARA Principle: ALARA stands for “As Low As Reasonably Achievable,” emphasizing the principle of minimizing radiation exposure while still obtaining diagnostic images. Operators should follow ALARA guidelines when setting exposure factors on the control panel, considering patient size, anatomical area, and imaging objectives.
3. Use of Personal Protective Equipment (PPE): Operators should wear appropriate PPE, including lead aprons, thyroid shields, and radiation monitoring badges, to shield themselves from radiation exposure. PPE is crucial for reducing the absorption of scattered radiation during X-ray procedures.
4. Collimation and Beam Limitation: Proper collimation restricts the X-ray beam to the area of interest, preventing unnecessary exposure to surrounding tissues. Operators should use collimators to adjust the size and shape of the X-ray field according to the imaging requirements, promoting focused and controlled radiation exposure.
5. Filtration and Beam Quality: Regularly check and ensure the adequacy of the X-ray tube’s inherent and added filtration. Proper filtration contributes to beam quality and reduces unnecessary radiation dose to patients.
6. Patient Positioning: Accurate patient positioning is essential for obtaining diagnostic images with minimal radiation exposure. Ensuring proper alignment reduces the need for repeat exposures and enhances patient safety.
7. Audible and Visual Warning Systems: X-ray control panels are equipped with audible and visual warning systems to alert operators when X-ray exposure is initiated. Operators should pay close attention to these warnings to avoid accidental exposure.
8. Control Panel Accessibility: Restrict access to the X-ray control panel to authorized personnel only. Implement measures to prevent unauthorized individuals, including patients and visitors, from accessing the control panel during X-ray procedures.
9. Regular Equipment Maintenance: Conduct routine maintenance checks on the X-ray control panel to identify and address any malfunctions promptly. Regular calibration and servicing contribute to the overall safety and performance of the equipment.
10. Emergency Shutdown Procedures: Clearly understand and practice emergency shutdown procedures. In case of unexpected events or malfunctions, operators should be prepared to quickly and safely terminate X-ray exposure.
11. Dosimetry Monitoring: Implement a dosimetry monitoring program to track the radiation exposure of personnel. Periodic assessments ensure that occupational exposure remains within acceptable limits.
12. Compliance with Regulatory Standards: Adhere to local and international regulatory standards and guidelines governing X-ray equipment operation. Compliance with these standards ensures that the facility operates in a safe and legally sound manner.
By rigorously implementing these safety measures, healthcare facilities can create a secure environment for X-ray procedures, promoting the well-being of both healthcare professionals and patients. Regular training, awareness, and adherence to established safety protocols contribute to the overall effectiveness of radiation protection measures in medical imaging.
Quality Assurance and Calibration in X-ray Control Panel
Ensuring the accuracy and reliability of an X-ray control panel is essential for obtaining high-quality diagnostic images while minimizing radiation exposure. Quality assurance (QA) and calibration practices play a crucial role in maintaining the performance of X-ray equipment. Here’s an overview of QA and calibration processes associated with X-ray control panels:
1. Regular QA Programs: Establishing a comprehensive QA program is fundamental to monitor and maintain the performance of X-ray control panels. Routine quality checks help identify any deviations or malfunctions in the system.
2. Image Quality Assessment: Periodic evaluations of image quality involve assessing factors such as spatial resolution, contrast, and artifact presence. QA protocols may include the use of test objects, phantoms, and standardized imaging procedures to ensure consistent image quality.
3. Exposure Output Verification: QA procedures should include measurements of exposure output to confirm that the X-ray control panel delivers the intended radiation dose. This process ensures that the equipment meets regulatory standards and provides the necessary diagnostic information.
4. Collimator Alignment Checks: Regularly verifying the alignment of the collimator is crucial for limiting the X-ray beam to the desired area and preventing unnecessary radiation exposure. QA checks should confirm that the collimator adjustment mechanisms are functioning correctly.
5. Filtration Assessment: QA programs include assessments of the filtration system to ensure proper beam quality. Filters should be routinely inspected and, if necessary, replaced to maintain the required beam hardness and reduce patient radiation dose.
6. Reproducibility Checks: Consistency in X-ray exposures is essential for diagnostic accuracy. QA protocols should assess the reproducibility of exposures by repeating imaging procedures under identical conditions to verify that the control panel settings produce consistent results.
7. Detector Calibration: Calibration of the X-ray detector is critical for accurate image acquisition. Regular checks and calibrations of the detector system help maintain its sensitivity and response to X-rays, ensuring that acquired images reflect the true anatomical structures.
8. System Software Updates: Keep X-ray control panel software up-to-date with the latest manufacturer-recommended updates and patches. Regularly updating the system software enhances performance, addresses potential issues, and incorporates advancements in imaging technology.
9. Dose Monitoring and Management: Implement dose monitoring systems to track and manage radiation exposure levels. This allows healthcare facilities to maintain doses within acceptable limits, enhance patient safety, and comply with regulatory requirements.
10. Accreditation and Compliance: Adhere to accreditation standards and regulatory requirements related to X-ray equipment. Compliance with established guidelines ensures that the facility operates within accepted quality and safety parameters.
11. Collaborative Approach: Foster a collaborative approach involving radiologists, medical physicists, and technologists in QA efforts. Regular communication and teamwork contribute to a comprehensive understanding of system performance and address issues effectively.
12. Documentation and Record Keeping: Maintain thorough documentation of QA activities, including calibration records, test results, and any corrective actions taken. Comprehensive records provide a historical overview of the X-ray control panel’s performance and aid in troubleshooting.
By integrating these QA and calibration practices into the operational workflow, healthcare facilities can uphold the quality and safety of X-ray imaging. Regular assessments, attention to detail, and compliance with industry standards contribute to the ongoing reliability and effectiveness of X-ray control panels in medical diagnostics.
Examine Common Troubleshooting Issues
Troubleshooting issues with X-ray machines can be critical for ensuring the quality of imaging and the safety of patients and operators. Here are some common issues that might arise with X-ray systems and how to resolve them:
1. Inconsistent Image Quality
Problem:
Images appear too dark, too light, blurry, or have low contrast. This can be caused by incorrect exposure settings, equipment malfunctions, or issues with image processing algorithms.
Resolution:
- Check Exposure Settings: Ensure that the exposure time, mA, and kVp settings are appropriate for the patient’s size and the type of examination. Adjust these settings as needed.
- Recalibrate AEC: If the Automatic Exposure Control (AEC) is not functioning correctly, recalibrate it according to the manufacturer’s guidelines.
- Inspect the Detector: Ensure that the X-ray detector or image receptor is clean and properly aligned. Dirty or misaligned detectors can degrade image quality.
- Evaluate Image Processing: If the image processing algorithms are causing issues, reset them to default settings or consult the user manual for troubleshooting specific algorithms.
2. Equipment Not Powering On
Problem:
The X-ray machine does not turn on or loses power intermittently, which can be caused by electrical issues, faulty power supplies, or internal component failures.
Resolution:
- Check Power Connections: Ensure that the machine is plugged in properly and that the power cord is not damaged. Verify that the electrical outlet is functional.
- Inspect Fuses and Circuit Breakers: Check the machine’s fuses and circuit breakers. Replace any blown fuses and reset any tripped breakers.
- Test the Power Supply: If the machine still does not power on, the issue could be with the internal power supply. This may require a professional technician to inspect and repair.
3. Radiation Exposure Errors
Problem:
The X-ray machine either overexposes or underexposes the patient, leading to poor image quality or potential safety concerns.
Resolution:
- Recheck Settings: Double-check the exposure settings to ensure they are correctly configured for the specific examination.
- Inspect AEC Functionality: If using Automatic Exposure Control, verify that it is working correctly. Recalibrate if necessary.
- Verify Filtration: Ensure that the filtration settings are appropriate for the examination. Improper filtration can lead to incorrect exposure levels.
- Monitor Patient Positioning: Incorrect patient positioning can cause overexposure or underexposure. Ensure the patient is properly aligned with the X-ray beam.
4. Error Messages or Alarms
Problem:
The X-ray machine displays error messages or sounds alarms, which could indicate issues with system components, software malfunctions, or safety concerns.
Resolution:
- Consult the Manual: Refer to the user manual for specific error codes and troubleshooting steps.
- Reset the Machine: Sometimes, a simple reset can clear error messages. Power off the machine, wait a few moments, and then power it back on.
- Check System Logs: If the machine has diagnostic logs, review them to identify the root cause of the error. This may provide insights into whether the issue is hardware or software-related.
- Contact Technical Support: If the error persists and is not easily resolved, contact the manufacturer’s technical support team for further assistance.
5. Image Artifacts
Problem:
Unwanted artifacts, such as lines, spots, or distortions, appear in the images. These can be caused by detector issues, patient movement, or external interference.
Resolution:
- Inspect the Detector: Clean the detector and ensure it is free of dust, debris, or any other contaminants that could cause artifacts.
- Check for Patient Movement: Instruct patients to remain as still as possible during the X-ray. Use immobilization devices if necessary, especially with pediatric patients.
- Shield Against Interference: Ensure that the imaging room is free from external sources of electromagnetic interference, which could affect image quality.
6. System Freezing or Crashing
Problem:
The X-ray machine’s control panel or software freezes or crashes during operation, which could be due to software bugs, hardware issues, or insufficient system resources.
Resolution:
- Restart the System: A system restart can often resolve temporary software glitches. Make sure to save any work before restarting.
- Update Software: Ensure that the X-ray machine’s software and firmware are up to date. Manufacturers often release updates to fix bugs and improve system stability.
- Check for Overheating: Overheating can cause system crashes. Ensure that the machine’s ventilation is not obstructed and that it is operating in a cool environment.
- Clear Memory Cache: If the system is low on resources, clearing the memory cache or increasing system memory might help. This may require professional service to upgrade hardware components.
7. Inaccurate Patient Positioning
Problem:
Incorrect patient positioning can result in suboptimal images, repeat exposures, and increased radiation dose.
Resolution:
- Use Positioning Aids: Utilize positioning aids, such as sponges or straps, to help patients maintain the correct posture.
- Provide Clear Instructions: Give patients clear instructions on how to position themselves and what to expect during the procedure.
- Double-Check Alignment: Before taking the X-ray, double-check the patient’s alignment with the X-ray beam and the area of interest.
8. Calibration Issues
Problem:
The X-ray machine produces inconsistent results due to calibration errors, which can affect image quality and accuracy.
Resolution:
- Perform Routine Calibration: Regularly calibrate the X-ray machine according to the manufacturer’s guidelines to ensure accuracy.
- Check Calibration Tools: Ensure that the tools and devices used for calibration are in good condition and functioning correctly.
- Schedule Professional Calibration: If internal calibration does not resolve the issue, schedule a professional calibration service to ensure the machine is operating correctly.
Troubleshooting X-ray machines requires a combination of technical knowledge, attention to detail, and an understanding of the specific equipment being used. Regular maintenance, proper training, and adherence to manufacturer guidelines are crucial for minimizing issues and ensuring that the X-ray system operates safely and effectively. By promptly addressing these common problems, healthcare providers can ensure that they consistently produce high-quality diagnostic images while maintaining patient safety.
Information on Maintenance and Calibration of X-ray Control Panels
Maintaining and calibrating X-ray control panels is essential for ensuring optimal performance, accuracy in imaging, and safety for both patients and operators. Regular maintenance and calibration help prevent equipment malfunctions, reduce the likelihood of image errors, and ensure that the X-ray machine operates within the manufacturer’s specifications. Below is a comprehensive guide on how to maintain and calibrate X-ray control panels.
1. Regular Maintenance of X-Ray Control Panels
a. Visual Inspection
- Daily Check: Perform a daily visual inspection of the X-ray control panel to identify any obvious signs of wear, damage, or malfunction. Check for loose or damaged buttons, knobs, and touch screens.
- Cable and Connection Inspection: Ensure that all cables and connections are secure and free of fraying or other damage. Damaged cables can affect the functionality and safety of the X-ray machine.
- Cleanliness: Keep the control panel clean by wiping it down with a soft, lint-free cloth. Avoid using harsh chemicals or abrasive materials that could damage the surface. Dust and debris can interfere with the controls and display.
- Display Screen: Ensure that the display screen is clear and free of smudges, which can obscure important information or settings.
b. Functional Checks
- Button Functionality: Test all buttons, switches, and knobs to ensure they are responsive and functioning correctly. Unresponsive controls could indicate an internal issue that requires attention.
- Touch Screen Calibration: If the control panel includes a touch screen, periodically check its calibration to ensure that it accurately responds to touch inputs.
- Warning Lights and Alarms: Verify that all warning lights, indicators, and alarms are operational. These are crucial for alerting operators to potential issues.
c. Software and Firmware Updates
- Check for Updates: Regularly check for software and firmware updates provided by the manufacturer. These updates often include bug fixes, new features, and improvements to system performance.
- Installation: Install updates according to the manufacturer’s instructions. Ensure that the system is backed up before performing any updates to avoid data loss.
- Testing Post-Update: After updating, run a series of tests to ensure that the control panel and X-ray machine are functioning correctly.
d. Environmental Maintenance
- Temperature and Humidity Control: Ensure that the control panel operates in an environment with stable temperature and humidity levels. Extreme conditions can affect electronic components and lead to malfunctions.
- Protection from Dust and Contaminants: Keep the control panel in a clean, dust-free environment. Consider using dust covers when the equipment is not in use.
- Power Supply Stability: Ensure that the power supply to the X-ray machine is stable and free of surges or interruptions. Use a surge protector or an uninterruptible power supply (UPS) to protect the equipment.
2. Calibration of X-Ray Control Panels
Calibration is the process of adjusting the X-ray control panel and related systems to ensure that the machine produces accurate and consistent images. Regular calibration is crucial for maintaining image quality and ensuring accurate diagnostic results.
a. Calibration Schedule
- Initial Calibration: Perform an initial calibration when the X-ray machine is installed or after major repairs or component replacements.
- Routine Calibration: Conduct routine calibration at intervals specified by the manufacturer, typically every 6 to 12 months.
- Post-Maintenance Calibration: Recalibrate the control panel after any significant maintenance or adjustment to the X-ray machine, especially if the settings or components have been altered.
b. Calibration Procedures
- Follow Manufacturer Guidelines: Always adhere to the calibration procedures outlined in the manufacturer’s manual. Each X-ray system may have specific calibration steps that must be followed precisely.
- Use Calibration Tools: Utilize the appropriate calibration tools and devices, such as dosimeters, phantom objects, and calibration software, to measure and adjust the system’s output.
- Step-by-Step Calibration:
- kVp Calibration: Verify and adjust the kilovolt peak (kVp) settings to ensure that the X-ray machine is producing the correct energy level for each examination type.
- Exposure Time Calibration: Check and calibrate the exposure time settings to ensure that the machine is delivering the correct duration of X-ray exposure.
- mA Calibration: Measure and adjust the milliamperage (mA) settings to ensure that the X-ray tube current is consistent with the desired exposure levels.
- Automatic Exposure Control (AEC) Calibration: If the machine uses AEC, calibrate the sensors and settings to ensure that the system automatically adjusts exposure parameters accurately based on the patient’s size and the examination type.
- Filtration Calibration: Ensure that the filtration settings are correctly calibrated to remove low-energy X-rays, which do not contribute to image formation but increase patient dose.
c. Verification and Documentation
- Verify Calibration Results: After calibration, perform test exposures on phantom objects or test subjects to verify that the system is producing accurate images. Compare the results against known standards.
- Document Calibration: Maintain detailed records of all calibration activities, including the date, procedures followed, tools used, and the results of the verification tests. Documentation is essential for regulatory compliance and for tracking the performance of the X-ray machine over time.
d. Calibration Troubleshooting
- Inconsistent Results: If calibration results are inconsistent, repeat the process and ensure that all tools and devices are functioning correctly. Double-check the settings and procedures.
- Consult Manufacturer Support: If issues persist during calibration, contact the manufacturer’s technical support for assistance. They can provide guidance on advanced troubleshooting and may recommend professional calibration services.
3. Professional Maintenance and Calibration Services
While routine maintenance and calibration can often be performed by trained staff, it is recommended to schedule periodic professional inspections and calibration services. Certified technicians have the expertise and specialized equipment needed to thoroughly assess and optimize the performance of X-ray machines.
- Annual Professional Inspection: Schedule a professional inspection and calibration at least once a year. This ensures that the X-ray machine is in optimal condition and that any potential issues are identified and addressed early.
- Advanced Diagnostics: Professionals can perform advanced diagnostics to detect underlying issues that may not be apparent during routine maintenance.
Maintaining and calibrating X-ray control panels is critical for ensuring high-quality imaging, patient safety, and the longevity of the equipment. By adhering to a regular maintenance schedule, performing accurate calibration, and seeking professional assistance when necessary, healthcare providers can maximize the reliability and effectiveness of their X-ray systems.
Final Words
Efficiency in utilizing an X-ray control panel is a fundamental aspect of providing high-quality radiographic services. By mastering the intricacies of the control panel and implementing best practices, radiographers contribute significantly to accurate diagnostics and patient well-being. Continuous learning, adherence to safety measures, and effective communication are key elements in ensuring a streamlined and effective radiography process.
References
Books
- “Radiologic Science for Technologists: Physics, Biology, and Protection” by Stewart C. Bushong: This textbook provides an in-depth understanding of the physics behind radiology, including X-ray technology, control panel settings, and safety measures.
- “Principles of Radiographic Imaging: An Art and a Science” by Richard R. Carlton and Arlene M. Adler: This book covers the principles of radiographic imaging, including detailed discussions on control panel operations, image quality, and patient safety.
- “Essentials of Radiographic Physics and Imaging” by James Johnston and Terri L. Fauber: This is another excellent resource for understanding the technical aspects of radiographic equipment, including control panel functions and maintenance.
Online Resources
- RSNA’s RadiologyInfo.org: This website provides patient-friendly information on radiological procedures, including the use of X-rays, safety considerations, and what to expect during an X-ray examination.
- The American Society of Radiologic Technologists (ASRT): ASRT offers resources and continuing education courses for radiologic technologists, covering equipment operation, image quality, and patient safety.